• Skip to main content
  • Skip to header right navigation
  • Skip to site footer
3PL Support

3PL Support

BrokerWare Support from 3PL Systems

  • 3PL University
  • Change Requests
  • News & Updates
  • Dev Center
  • 3PL Systems
  • 3PL University – Videos [210]
    • Operations [79]
      • Dashboard [5]
        • Dashboard General Overview
        • Dashboard Tile Overview [1]
          • Dispatching – Booked Covered Tile
        • Source Capacity Dashboard
        • Tile Configuration
      • Customers [30]
        • Creating a Customer
        • Customer List
        • Customer Profile [11]
          • Customer Profile – Overview
          • Customer Contacts List
          • Adding a Customer Contact
          • Customer Access Levels [6]
            • Admin
            • Accounting
            • Operations
            • Restricted Operations
            • Vendor Access
            • Tracking Only
          • Customer Address Book
        • Master Accounts [2]
          • Master Accounts
          • Address Book/Contacts/Products
        • Customer Tools [8]
          • Excluded Carriers
          • How to Add a Third-Party Payer
          • Custom Carrier Compliance Events
          • Transaction Summary – Overview
          • Transaction Detail – Overview
          • Reference Fields
          • Shipment Summary – Overview
          • Uploading a Customer Logo
        • Customer Portal [2]
          • Customer Portal Dashboard
          • Entering and Quoting a Load in Customer Portal
        • Mass Deleting Address Book and Product Catalog Entries
      • Carriers [11]
        • How to Add a TL Carrier
        • Carrier Contact Functions
        • Carrier Portal
        • Carrier Tools [4]
          • Carrier Tariff Management
          • Carrier Transaction Detail
          • Carrier Transaction Summary (overview)
          • Carrier Shipment Summary
        • Add/Update Carrier Insurance
        • Carrier Groups
        • Carrier Insurance Management
      • Staff [5]
        • Create Staff [3]
          • Access Levels [2]
            • Bypass Carrier Insurance
            • Bypass Over Credit Limit
        • Office Locations
      • Load/Shipment [23]
        • How to Create a Load
        • Shipment Profile Lifecycle
        • Carrier Rate Con – Electronic Signature
        • Customer Rate Quotes – Electronic Signatures
        • Load Profile [11]
          • Commodity Field [1]
            • Updating Commodity Order
          • Adding Additional Carriers
          • How to Change or remove a Carrier from a Load
          • Source Capacity (Volume Quotes) [2]
            • Overview
            • Sending Volume Rate Request
          • Dispatching – Manual and E-Mail Dispatch
          • E-Dispatch Request & Response
          • Priority Shipments (Hot/Trace)
          • Send Docs – Multiple Loads
        • Appointment Management
        • Tracking – Check Calls
        • Changing Commodity Order
        • Posting to Load Boards [2]
          • Multiple Day Load Board Posting
          • Auto Load Board Posting
        • Advanced Shipment Booking
    • Accounting [61]
      • Shipment [4]
        • Modify Pricing
        • Changing Carriers
        • Multiple Carrier Bills
        • How to add a Third-Party Payer
      • How to Create an Invoice
      • Accounts Receivable [5]
        • AR Invoicing [1]
          • General Overview
        • AR Aging Detail
        • AR Aging Summary
        • Consolidated Invoicing
      • Accounts Payable [4]
        • AP Invoicing
        • AP Aging Detail
        • AP Aging Summary
        • Create Additional Carrier Bills
      • Staff Commissions [3]
        • Released Commissions Report
        • Audit Commissions
        • House Commissions
      • Customer Profile [5]
        • Invoice Preferences [1]
          • Late Fees
        • Customer Statement [2]
          • Overview
          • Scheduling Invoices/Statements
      • Invoice Printing [4]
        • Overview
        • Print History
        • Reset Printing Queue
        • EDI with Supporting Documents
      • Office Locations
      • HyperionTMS – Accounting Updates (June 2022) [11]
        • AR & AP – Invoicing [4]
          • AR & AP Invoicing
          • AR – Invoice Revision – Increase
          • AR – Revision – Credit Memo
          • AP – Revision – Accrual Based
        • Check History – Void Checks
        • Commissions – Revisions
        • Invoice Preferences
        • Updated Staff Permissions
        • Carrier Sales
        • Webinar Meeting – Recording 6/12/2022
      • Internal Accounting [6]
        • Pay Bills
        • Pay Invoices
        • Applying Credits [2]
          • AR Credits (Customer Refund)
          • AP Credits (Vendor Refund)
        • Pay Commissions
      • QuickBooks [8]
        • QuickBooks Desktop [5]
          • Sync Tool Configuration
          • AR/AP Recon Tool
          • Customer Recon Tool
          • List ID Tool
          • Applying AR/AP Credits
        • QuickBooks Online [1]
          • Applying Credits QBO
    • Tariff [19]
      • Tariff Creation [12]
        • API Tariff [5]
          • API Tariff Overview
          • Create a Global API Tariff
          • Create a Customer API Tariff
          • Add Service Lane Markup (API)
          • Adding Carriers to API Tariff – Customer Specific
        • Custom Tariff [4]
          • Custom Tariff Overview
          • Creating a Custom Carrier Tariff
          • Creating a Custom Customer Tariff
          • Creating a Custom Markup Tariff
        • Editing a Service Lane
      • Tariff List
      • Accessorials
      • Regions
      • Fuel Schedule & Schedule List
      • Pricing Programs
      • Carrier Tariff Management
    • EDI [3]
      • EDI Log
      • EDI 210 Matching
      • EDI 214 – Sending Late Reason Codes to your Customer
    • More [43]
      • Admin Tools [9]
        • Custom Reference Fields [4]
          • Global Custom Reference Fields
          • Customer Custom Reference Fields
          • Where to Find Custom Reference Fields
          • How to report Custom Reference Fields
        • Custom Text [1]
          • Overview
        • Ship Mind
        • System Alerts
      • Case Management
      • Mass Rater
      • Carrier Sales
      • Tools [7]
        • Advanced Search
        • Lane History Tool
        • Report Builder [4]
          • Report Builder
          • Report Builder – Shipment Report
          • Report Builder – Carrier Report
          • Report Builder – Customer Report
      • Documents [2]
        • Document Uploader
        • Global Documents
      • Integrations [13]
        • Customer API key
        • Carrier Integrations
        • Partner Integrations [8]
          • Cargo Chief
          • Global Logistics Solutions [4]
            • GLS Overview
            • Insurance Rate Markup
            • Updating Insurance Information
            • Removing Insurance Accessorial & Certificate
          • MacroPoint Capacity
          • Shiplify
        • Power BI [1]
          • Power BI – General Overview
      • Manager Reports [1]
        • Tariff Profitability
      • OnTime Report
      • Admin [1]
        • Min and Max Margins
  • 3PL University – User Guides [106]
    • Carriers [11]
      • Carrier Groups
      • Carrier List [2]
        • Add Bill-To Address for third-party integrations
        • Carrier Portal
      • Carrier Profile [2]
        • Create a Carrier Profile
        • How to Add/Update Carrier Insurance
      • Add multiple carriers/vendors to multi stop load
      • Rate Con vs Dispatch Sheet
      • Carrier Compliance setup
      • Adding a Secondary Vendor to a load
    • Customers [13]
      • Adding Accounting Contacts
      • Adding Contacts to a Customer Profile
      • Customer Credit
      • Customer Log In Access Levels
      • Customer Relationship Management (CRM)
      • Hours of Operations
      • How to add a third-party payer
      • Indicate Primary Sales Rep
      • Sending a Customer Statement and Open Invoices
      • Sending and Scheduling Customer Statements
      • Master and Sub-Accounts
      • Create a Customer Profile
      • Changing a Customer on a load.
    • Staff [10]
      • Assigned To function
      • Add an Office Location Label
      • Staff Access Levels – UPDATED [6]
        • Admin
        • Manager
        • Accounting
        • Operations
        • Customer Sales
        • Carrier Sales
      • Creating a Staff Member
    • Accounting [7]
      • Adding Canada Tax Configurations
      • Claim Log
      • Completed Status of loads
      • Consolidated Invoicing
      • Adding carrier SCAC to Customer Invoices with PRO Number
      • Electronic Signatures
      • Billing & View function
    • Tariff [7]
      • Add Service Lane Markup to API Tariff
      • Add/Create Customer API tariff
      • Creating Accessorials
      • How to create a Pricing Program
      • Priority & Contracted Lane Indicators on Service Lanes
      • Region Lists
      • Add Bill-To information for a Customer Specific Account: API Customer Tariff
    • Documents [1]
      • Mass Document Uploader
    • Tools [2]
      • Creating a Carrier Report via Report Builder
      • Non-Compliance Feature (Events, Root Causes, QN notes)
    • Admin Tools [3]
      • Changing Document Addresses
      • Staff Groups
      • Add Equipment Types to system
    • Integrations [37]
      • Carrier Integrations [18]
        • accuFRATE [4]
          • Service Level Types
          • Enabling and Using accuFrate in BrokerWare [2]
            • Canceling a Pick Up
            • Managing Carrier Payables
        • Fast Exact
        • FedEx [3]
          • FedEx 411
          • FedEx – How to get credentials
          • FedEx – Configuring BrokerWare
        • TForce Freight [2]
          • TForce Freight – How to get Credentials
          • TForce Freight – Configuring BrokerWare
        • GlobalTranz
        • Shipstore [1]
          • Shipstore FAQ – READ FIRST
        • SAIA LTL [1]
          • SAIA – How to get credentials
      • Partner Integrations [17]
        • Authorize.Net
        • Macropoint Tracking
        • Project44 Tracking (Inbound to TMS)
        • SMC3 Volume
        • Triumph Pay Audit (Formerly Hubtran)
        • Trucker Path Load Board
        • TruckStop.com Load Board
        • DAT [4]
          • DAT Loadboard Integration Info
          • RESTFUL API – Service Accounts – LOAD BOARD Updated Requirements
          • DAT Rate View
          • Web Connexion – Integration Credentials
        • Bitfreighter
        • Greenscreens [2]
          • Configuring the TMS
          • Equipment Type Mapping
        • TextLocate
    • QuickBooks [3]
      • Desktop Sync Tool Configuration
      • Re-Authorize Sync Application in QuickBooks Desktop
      • Office GL Code setup – QuickBooks Desktop
    • EDI [1]
      • Inbound 204/214 – Do not update date/time toggle
  • Freight Bazaar [7]
    • Buyer Portal
    • Provider Details
    • Rating and Load Details
    • Help [3]
      • Seller help
      • Buyer help
      • Static Accessorial List
  • Industry Knowledge [6]
    • EDI
    • Freight Classes
    • Package Types
    • Accessorials
    • PRO Number Check-Digit
    • Linear Feet Calculation
  • Webinars [2]
    • Cargo Chief Digital Freight Matching and BrokerWare
    • Digital Freight Matching
  • Other [2]
    • User Group Meeting (2022)
    • BrokerWare v2 Themes (as of January 2023)
  • FAQ [10]
    • How do I submit a change or enhancement request?
    • How do I get live Support?
    • How many shipments or lines can I rate with Mass Rater?
    • The LCR is stating that this carrier is not setup as a carrier or not marked as an XML rate, what do we need to do?
    • I can’t seem to find my shipment by BOL in the search bar?
    • How often does the TMS pull for Carrier E-Docs?
    • How to use the Copy/Paste Feature
    • What fields can we search in the quick search bar?
    • The PODs are not being included when I send from invoice printing.
    • Shipmind FAQ
  • Home
  • /
  • Documentation
  • /
  • 3PL University – User Guides
  • /
  • Integrations
  • /
  • Partner Integrations

Macropoint Tracking

To setup Macropoint, go to Integrations > Other Integrations. The Integrations section can only be accessed by an Admin login. Add Macropoint to the Integrations section.

  • In the Macropoint Integrations Details window, the username will always be BW6V7K0. This is 3PL’s username that is static for the integration to work.
  • The password and Macropoint ID is unique to the brokerage’s account. You can obtain this info by speaking to a Macropoint rep.

The Update Shipment Status drop down allows you to enable the ability for Macropoint statuses to update the load’s status in BrokerWare pending what info is sent. If you do NOT enable this flag, you will continue to have to manually update the load’s statuses in the system.

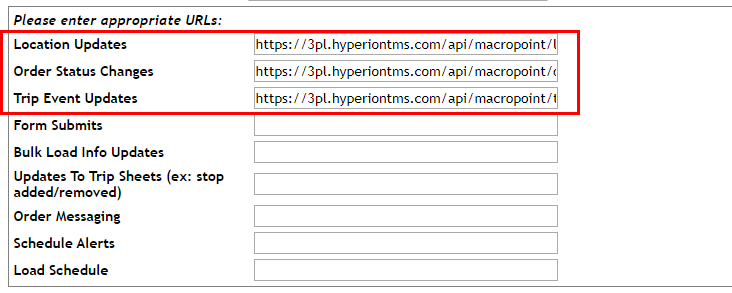
Please note the Notes section below with the URLs (Location Updates, Order Status Changes, Trip Event Updates).

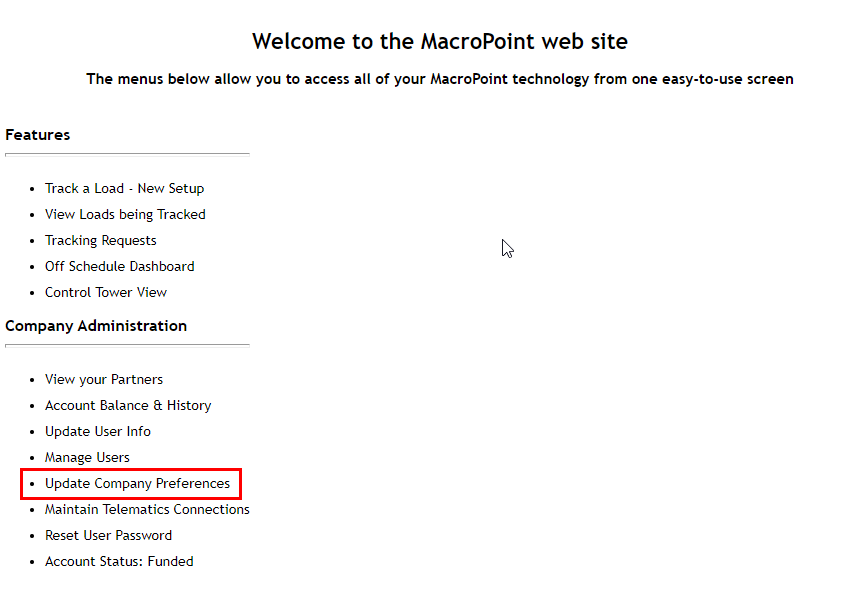
Log into your Macropoint account – https://macropoint-lite.com/ and click on Update Company Preferences.

Enter the corresponding URL information in the correct fields and hit Save. This is how the Macropoint integration ties together with your account and 3PL’s system.

To use Macropoint within the system, go to the load you wish to request tracking info on. In the Actions box, click Macropoint. A pop-up window will appear to enter information. You will want to at least enter the driver’s cell phone number to send him/her a request to send tracking information.

Please Note: drivers may or may not acknowledge the request.

Enter the number of hours you wish to retrieve tracking information as well as the intervals as to when the system will retrieve tracking information. Set the day and time you want to start tracking, note the Time Zone to track in and hit Track now.

Once tracking info begins to populate, there will be a link called View Tracking. This will show updates that are sent in (if the driver sends any) and you can see the addresses, date, time and event info of what is happening.

This information can also be seen when logged into your Macropoint account and you can search for information by the load number of your system.

Last modified July 29, 2024

Doc navigation

< Authorize.Net Project44 Tracking (Inbound to TMS) >
Was this page helpful?
Yes No

Need More Support?

Getting a hold of a team member is easy. You can contact our support team Monday through Friday from 6:00 am – 5:00pm (Pacific Time).

Email: [email protected]

Phone: 800.965.8205 x2

Get in touch

800-965-8205
[email protected]

Navigation

  • 3PL University
  • Change Requests
  • News & Updates
  • Dev Center
  • 3PL Systems

Search

Search 3PLSupport.com

Copyright © 2025 · 3PL Systems, Inc. · All Rights Reserved · Built by Sir Lion Labs · v2.0