• Skip to main content
  • Skip to header right navigation
  • Skip to site footer
3PL Support

3PL Support

BrokerWare Support from 3PL Systems

  • 3PL University
  • Change Requests
  • News & Updates
  • Dev Center
  • 3PL Systems
  • 3PL University – Videos [157]
    • Operations [49]
      • Dashboard [4]
        • Dashboard General Overview
        • Dashboard Tile Overview [1]
          • Dispatching – Booked Covered Tile
        • Source Capacity Dashboard
      • Customers [19]
        • Creating a Customer
        • Customer List
        • Customer Profile [4]
          • Customer Profile – Overview
          • Customer Contacts List
          • Adding a Customer Contact
          • Customer Address Book
        • Master Accounts [2]
          • Master Accounts
          • Address Book/Contacts/Products
        • Customer Tools [5]
          • Excluded Carriers
          • How to Add a Third-Party Payer
          • Custom Carrier Compliance Events
          • Transaction Summary – Overview
          • Transaction Detail (Overview)
        • Customer Portal [2]
          • Customer Portal Dashboard
          • Entering and Quoting a Load in Customer Portal
      • Carriers [7]
        • How to Add a TL Carrier
        • Carrier Contact Functions
        • Carrier Portal
        • Carrier Tools [1]
          • Carrier Tariff Management
        • Add/Update Carrier Insurance
        • Carrier Groups
      • Staff [2]
        • Create Staff
        • Office Locations
      • Load/Shipment [12]
        • How to Create a Load
        • Shipment Profile Lifecycle
        • Customer Rate Quotes – Electronic Signatures
        • Load Profile [8]
          • Commodity Field
          • Adding Additional Carriers
          • How to Change or remove a Carrier from a Load
          • Source Capacity (Volume Quotes) [2]
            • Overview
            • Sending Volume Rate Request
          • Dispatching – Manual and E-Mail Dispatch
          • Priority Shipments (Hot/Trace)
    • Accounting [53]
      • Shipment [4]
        • Modify Pricing
        • Changing Carriers
        • Multiple Carrier Bills
        • How to add a Third-Party Payer
      • How to Create an Invoice
      • Accounts Receivable [4]
        • AR Invoicing [1]
          • General Overview
        • AR Aging Detail
        • Consolidated Invoicing
      • Accounts Payable [1]
        • AP Invoicing
      • Staff Commissions [2]
        • Released Commissions Report
        • Audit Commissions
      • Customer Profile [5]
        • Invoice Preferences [1]
          • Late Fees
        • Customer Statement [2]
          • Overview
          • Scheduling Invoices/Statements
      • Invoice Printing [3]
        • Overview
        • Print History
        • Reset Printing Queue
      • Office Locations
      • HyperionTMS – Accounting Updates (June 2022) [11]
        • AR & AP – Invoicing [4]
          • AR & AP Invoicing
          • AR – Invoice Revision – Increase
          • AR – Revision – Credit Memo
          • AP – Revision – Accrual Based
        • Check History – Void Checks
        • Commissions – Revisions
        • Invoice Preferences
        • Updated Staff Permissions
        • Carrier Sales
        • Webinar Meeting – Recording 6/12/2022
      • Internal Accounting [5]
        • Pay Bills
        • Pay Invoices
        • Applying Credits [2]
          • AR Credits (Customer Refund)
          • AP Credits (Vendor Refund)
      • QuickBooks [7]
        • QuickBooks Desktop [5]
          • Sync Tool Configuration
          • AR/AP Recon Tool
          • Customer Recon Tool
          • List ID Tool
          • Applying AR/AP Credits
        • QuickBooks Online
    • Tariff [19]
      • Tariff Creation [12]
        • API Tariff [5]
          • API Tariff Overview
          • Create a Global API Tariff
          • Create a Customer API Tariff
          • Add Service Lane Markup (API)
          • Adding Carriers to API Tariff – Customer Specific
        • Custom Tariff [4]
          • Custom Tariff Overview
          • Creating a Custom Carrier Tariff
          • Creating a Custom Customer Tariff
          • Creating a Custom Markup Tariff
        • Editing a Service Lane
      • Tariff List
      • Accessorials
      • Regions
      • Fuel Schedule & Schedule List
      • Pricing Programs
      • Carrier Tariff Management
    • More [32]
      • Advanced Search
      • Carrier Sales
      • Custom Reference Fields [4]
        • Global Custom Reference Fields
        • Customer Custom Reference Fields
        • Where to Find Custom Reference Fields
        • How to report Custom Reference Fields
      • Custom Text [1]
        • Overview
      • Documents [2]
        • Document Uploader
        • Global Documents
      • Report Builder [4]
        • Report Builder
        • Report Builder – Shipment Report
        • Report Builder – Carrier Report
        • Report Builder – Customer Report
      • Integrations [7]
        • Carrier Integrations
        • Partner Integrations [5]
          • LogistIQ [4]
            • LogistIQ Overview
            • Insurance Rate Markup
            • Updating Insurance Information
            • Removing Insurance Accessorial & Certificate
      • Manager Reports [1]
        • Tariff Profitability
      • Ship Mind
      • System Alerts
      • OnTime Report
      • Admin [1]
        • Min and Max Margins
  • 3PL University – User Guides [72]
    • Carriers [11]
      • Carrier Groups
      • Carrier List [2]
        • Add Bill-To Address for third-party integrations
        • Carrier Portal
      • Carrier Profile [2]
        • Create a Carrier Profile
        • How to Add/Update Carrier Insurance
      • Add multiple carriers/vendors to multi stop load
      • Rate Con vs Dispatch Sheet
      • Carrier Compliance setup
      • Adding a Secondary Vendor to a load
    • Customers [12]
      • Adding Accounting Contacts
      • Adding Contacts to a Customer Profile
      • Customer Log In Access Levels
      • Customer Relationship Management (CRM)
      • Hours of Operations
      • How to add a third-party payer
      • Indicate Primary Sales Rep
      • Sending a Customer Statement and Open Invoices
      • Sending and Scheduling Customer Statements
      • Master and Sub-Accounts
      • Create a Customer Profile
      • Changing a Customer on a load.
    • Staff [10]
      • Assigned To function
      • Add an Office Location Label
      • Staff Access Levels – UPDATED [6]
        • Admin
        • Manager
        • Accounting
        • Operations
        • Customer Sales
        • Carrier Sales
      • Creating a Staff Member
    • Accounting [6]
      • Adding Canada Tax Configurations
      • Claim Log
      • Consolidated Invoicing
      • Adding carrier SCAC to Customer Invoices with PRO Number
      • Electronic Signatures
      • Billing & View function
    • Tariff [7]
      • Add Service Lane Markup to API Tariff
      • Add/Create Customer API tariff
      • Creating Accessorials
      • How to create a Pricing Program
      • Priority & Contracted Lane Indicators on Service Lanes
      • Region Lists
      • Add Bill-To information for a Customer Specific Account: API Customer Tariff
    • Documents [1]
      • Mass Document Uploader
    • Tools [2]
      • Creating a Carrier Report via Report Builder
      • Non-Compliance Feature (Events, Root Causes, QN notes)
    • Admin Tools [3]
      • Changing Document Addresses
      • Staff Groups
      • Add Equipment Types to system
    • Integrations [7]
      • Trucker Path Loadboard
      • Triumph Pay Audit (formally Hubtran)
      • Authorize.Net
      • SMC3 Volume Integration
      • project44 / p44 Tracking
      • Macropoint Tracking
      • Partner Integrations
    • QuickBooks [3]
      • Desktop Sync Tool Configuration
      • Re-Authorize Sync Application in QuickBooks Desktop
      • Office GL Code setup – QuickBooks Desktop
  • Industry Knowledge [4]
    • EDI
    • Freight Classes
    • Package Types
    • Accessorials
  • Webinars [2]
    • Cargo Chief Digital Freight Matching and BrokerWare
    • Digital Freight Matching
  • Other [2]
    • User Group Meeting (2022)
    • BrokerWare v2 Themes (as of January 2023)
  • FAQ [2]
    • How do I submit a change or enhancement request?
    • How do I get live Support?
  • Home
  • /
  • Documentation
  • /
  • 3PL University – User Guides
  • /
  • Tariff

Add Service Lane Markup to API Tariff

Question: How do I add a markup to a service lane on an API tariff?

Click here for video walkthrough.

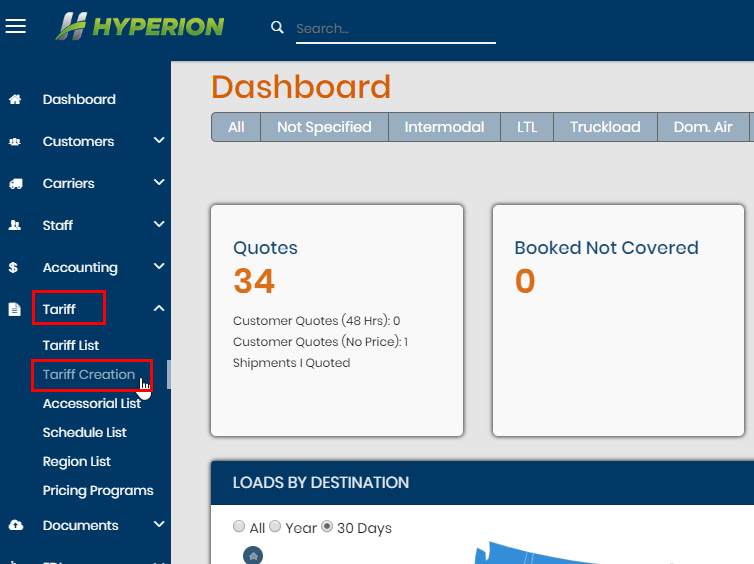
First, create an API tariff by going to Tariff > Tariff Creation.

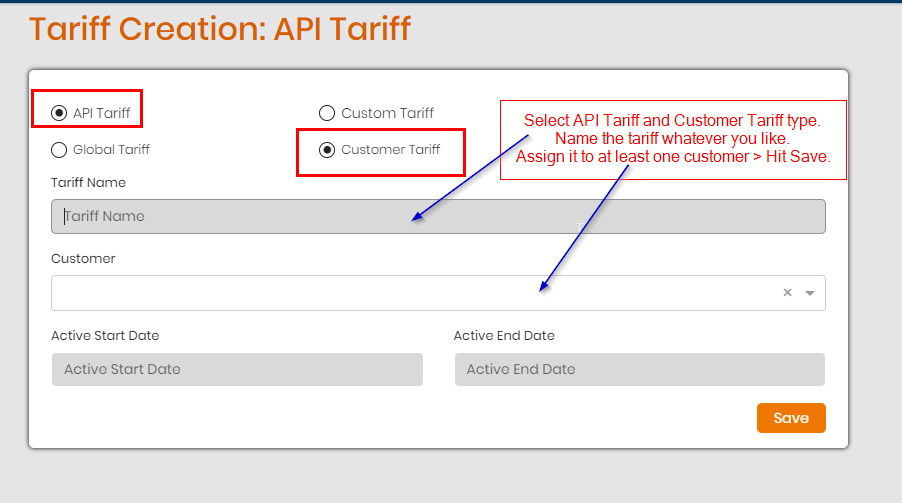
Select API Tariff > Customer Tariff.

Name the Tariff whatever you like; this name is internal so only staff will see this label. In the Customer section, select at least one customer to assign it to. You can assign this tariff to others after saving it.

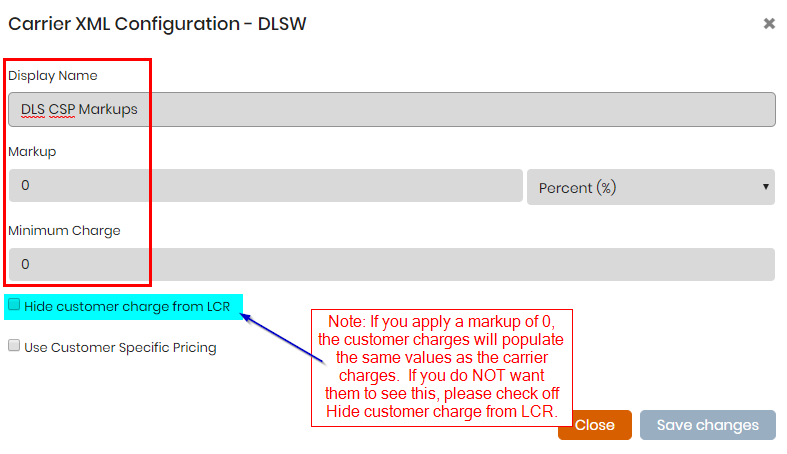
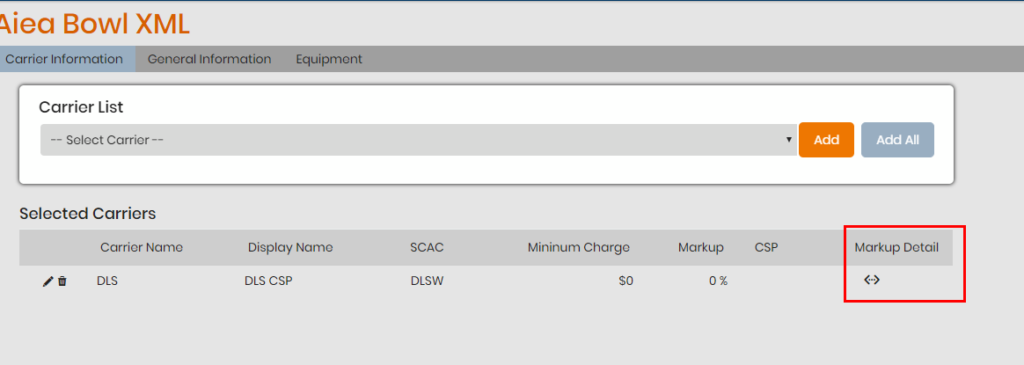
On the next page, select a carrier or third party integration to add to the tariff. Click Add. One the next window, you can add a Display Name if you wish (this is optional). If you add text here, this will be displayed in the LCR to both staff and customer views. Add a markup value if you wish and hit Save Changes.

Next click the <-> symbol to the right to enter the section to add service lanes and markups.

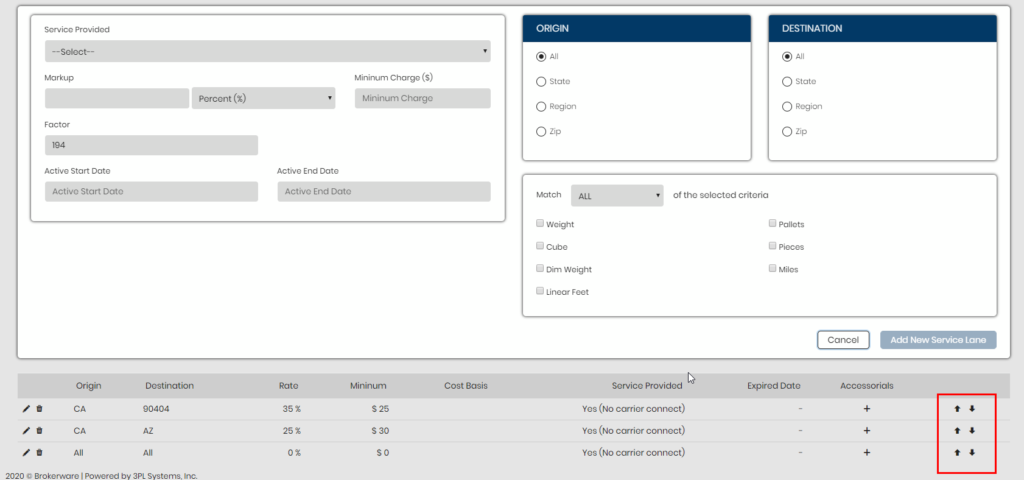
On the service lane markup page, fill out the info in the noted sections. This is how you add a service lane for the carrier or third party integration.

  • Service Provided – Select Yes or No
  • Markup – Add a markup value and also a Minimum.
  • Origin and Destination selections – choose what criteria the origin will start from and same for the destination. It can range from a service of ALL or down to a single zip or range of zips.
  • Criteria – this allows you to set a range of selections of selected criteria. You can have ALL the criteria match for a rate to pull or ANY of the noted criteria. ALL means that all of the criteria selected must match in order for this service lane to be considered. ANY means if any of the checked criteria matches, the service lane can be considered.

As you begin to establish service lanes for the carrier or third party integration, you can move them up or down in terms of which lane should be looked at first. Use the arrows on the right of each lane to move them up or down.

The order is from top to bottom. Note that if a service lane and its criteria match, the markup for that lane will be applied to the load.

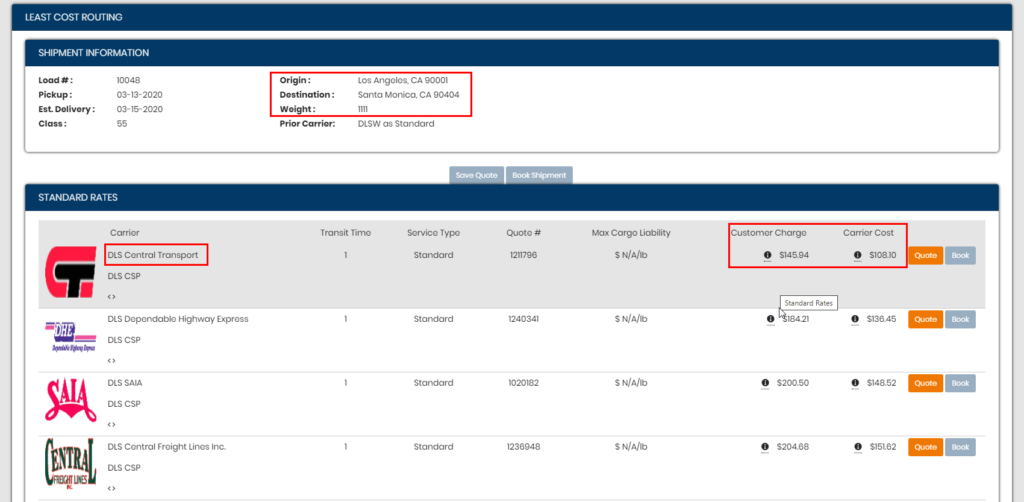
Make a load for the customer that has this customer API tariff applied to. Be sure the criteria matches at least one service lane from the tariff for the markup to be applied.

In this example, we had the ALL to ALL lane for DLS set to a $0 markup, however, we set a service lane for DLS to markup lanes from CA to 90404 at a 35% markup or a $25 minimum hence why we see a difference in the customer and carrier charges in the LCR.

Last modified March 6, 2022

Doc navigation

Add Bill-To information for a Customer Specific Account: API Customer Tariff >
Was this page helpful?
Yes No

Need More Support?

Getting a hold of a team member is easy. You can contact our support team Monday through Friday from 6:00 am – 5:00pm (Pacific Time).

Email: support@3plsystems.com

Phone: 800.965.8205 x2

Get in touch

800-965-8205
sales@3plsystems.com

Navigation

  • 3PL University
  • Change Requests
  • News & Updates
  • Dev Center
  • 3PL Systems

Search

Search 3PLSupport.com

Copyright © 2023 · 3PL Systems, Inc. · All Rights Reserved · Built by Sir Lion Labs