• Skip to main content
  • Skip to header right navigation
  • Skip to site footer
3PL Support

3PL Support

BrokerWare Support from 3PL Systems

  • 3PL University
  • Change Requests
  • News & Updates
  • Dev Center
  • 3PL Systems
  • 3PL University – Videos [157]
    • Operations [49]
      • Dashboard [4]
        • Dashboard General Overview
        • Dashboard Tile Overview [1]
          • Dispatching – Booked Covered Tile
        • Source Capacity Dashboard
      • Customers [19]
        • Creating a Customer
        • Customer List
        • Customer Profile [4]
          • Customer Profile – Overview
          • Customer Contacts List
          • Adding a Customer Contact
          • Customer Address Book
        • Master Accounts [2]
          • Master Accounts
          • Address Book/Contacts/Products
        • Customer Tools [5]
          • Excluded Carriers
          • How to Add a Third-Party Payer
          • Custom Carrier Compliance Events
          • Transaction Summary – Overview
          • Transaction Detail (Overview)
        • Customer Portal [2]
          • Customer Portal Dashboard
          • Entering and Quoting a Load in Customer Portal
      • Carriers [7]
        • How to Add a TL Carrier
        • Carrier Contact Functions
        • Carrier Portal
        • Carrier Tools [1]
          • Carrier Tariff Management
        • Add/Update Carrier Insurance
        • Carrier Groups
      • Staff [2]
        • Create Staff
        • Office Locations
      • Load/Shipment [12]
        • How to Create a Load
        • Shipment Profile Lifecycle
        • Customer Rate Quotes – Electronic Signatures
        • Load Profile [8]
          • Commodity Field
          • Adding Additional Carriers
          • How to Change or remove a Carrier from a Load
          • Source Capacity (Volume Quotes) [2]
            • Overview
            • Sending Volume Rate Request
          • Dispatching – Manual and E-Mail Dispatch
          • Priority Shipments (Hot/Trace)
    • Accounting [53]
      • Shipment [4]
        • Modify Pricing
        • Changing Carriers
        • Multiple Carrier Bills
        • How to add a Third-Party Payer
      • How to Create an Invoice
      • Accounts Receivable [4]
        • AR Invoicing [1]
          • General Overview
        • AR Aging Detail
        • Consolidated Invoicing
      • Accounts Payable [1]
        • AP Invoicing
      • Staff Commissions [2]
        • Released Commissions Report
        • Audit Commissions
      • Customer Profile [5]
        • Invoice Preferences [1]
          • Late Fees
        • Customer Statement [2]
          • Overview
          • Scheduling Invoices/Statements
      • Invoice Printing [3]
        • Overview
        • Print History
        • Reset Printing Queue
      • Office Locations
      • HyperionTMS – Accounting Updates (June 2022) [11]
        • AR & AP – Invoicing [4]
          • AR & AP Invoicing
          • AR – Invoice Revision – Increase
          • AR – Revision – Credit Memo
          • AP – Revision – Accrual Based
        • Check History – Void Checks
        • Commissions – Revisions
        • Invoice Preferences
        • Updated Staff Permissions
        • Carrier Sales
        • Webinar Meeting – Recording 6/12/2022
      • Internal Accounting [5]
        • Pay Bills
        • Pay Invoices
        • Applying Credits [2]
          • AR Credits (Customer Refund)
          • AP Credits (Vendor Refund)
      • QuickBooks [7]
        • QuickBooks Desktop [5]
          • Sync Tool Configuration
          • AR/AP Recon Tool
          • Customer Recon Tool
          • List ID Tool
          • Applying AR/AP Credits
        • QuickBooks Online
    • Tariff [19]
      • Tariff Creation [12]
        • API Tariff [5]
          • API Tariff Overview
          • Create a Global API Tariff
          • Create a Customer API Tariff
          • Add Service Lane Markup (API)
          • Adding Carriers to API Tariff – Customer Specific
        • Custom Tariff [4]
          • Custom Tariff Overview
          • Creating a Custom Carrier Tariff
          • Creating a Custom Customer Tariff
          • Creating a Custom Markup Tariff
        • Editing a Service Lane
      • Tariff List
      • Accessorials
      • Regions
      • Fuel Schedule & Schedule List
      • Pricing Programs
      • Carrier Tariff Management
    • More [32]
      • Advanced Search
      • Carrier Sales
      • Custom Reference Fields [4]
        • Global Custom Reference Fields
        • Customer Custom Reference Fields
        • Where to Find Custom Reference Fields
        • How to report Custom Reference Fields
      • Custom Text [1]
        • Overview
      • Documents [2]
        • Document Uploader
        • Global Documents
      • Report Builder [4]
        • Report Builder
        • Report Builder – Shipment Report
        • Report Builder – Carrier Report
        • Report Builder – Customer Report
      • Integrations [7]
        • Carrier Integrations
        • Partner Integrations [5]
          • LogistIQ [4]
            • LogistIQ Overview
            • Insurance Rate Markup
            • Updating Insurance Information
            • Removing Insurance Accessorial & Certificate
      • Manager Reports [1]
        • Tariff Profitability
      • Ship Mind
      • System Alerts
      • OnTime Report
      • Admin [1]
        • Min and Max Margins
  • 3PL University – User Guides [72]
    • Carriers [11]
      • Carrier Groups
      • Carrier List [2]
        • Add Bill-To Address for third-party integrations
        • Carrier Portal
      • Carrier Profile [2]
        • Create a Carrier Profile
        • How to Add/Update Carrier Insurance
      • Add multiple carriers/vendors to multi stop load
      • Rate Con vs Dispatch Sheet
      • Carrier Compliance setup
      • Adding a Secondary Vendor to a load
    • Customers [12]
      • Adding Accounting Contacts
      • Adding Contacts to a Customer Profile
      • Customer Log In Access Levels
      • Customer Relationship Management (CRM)
      • Hours of Operations
      • How to add a third-party payer
      • Indicate Primary Sales Rep
      • Sending a Customer Statement and Open Invoices
      • Sending and Scheduling Customer Statements
      • Master and Sub-Accounts
      • Create a Customer Profile
      • Changing a Customer on a load.
    • Staff [10]
      • Assigned To function
      • Add an Office Location Label
      • Staff Access Levels – UPDATED [6]
        • Admin
        • Manager
        • Accounting
        • Operations
        • Customer Sales
        • Carrier Sales
      • Creating a Staff Member
    • Accounting [6]
      • Adding Canada Tax Configurations
      • Claim Log
      • Consolidated Invoicing
      • Adding carrier SCAC to Customer Invoices with PRO Number
      • Electronic Signatures
      • Billing & View function
    • Tariff [7]
      • Add Service Lane Markup to API Tariff
      • Add/Create Customer API tariff
      • Creating Accessorials
      • How to create a Pricing Program
      • Priority & Contracted Lane Indicators on Service Lanes
      • Region Lists
      • Add Bill-To information for a Customer Specific Account: API Customer Tariff
    • Documents [1]
      • Mass Document Uploader
    • Tools [2]
      • Creating a Carrier Report via Report Builder
      • Non-Compliance Feature (Events, Root Causes, QN notes)
    • Admin Tools [3]
      • Changing Document Addresses
      • Staff Groups
      • Add Equipment Types to system
    • Integrations [7]
      • Trucker Path Loadboard
      • Triumph Pay Audit (formally Hubtran)
      • Authorize.Net
      • SMC3 Volume Integration
      • project44 / p44 Tracking
      • Macropoint Tracking
      • Partner Integrations
    • QuickBooks [3]
      • Desktop Sync Tool Configuration
      • Re-Authorize Sync Application in QuickBooks Desktop
      • Office GL Code setup – QuickBooks Desktop
  • Industry Knowledge [4]
    • EDI
    • Freight Classes
    • Package Types
    • Accessorials
  • Webinars [2]
    • Cargo Chief Digital Freight Matching and BrokerWare
    • Digital Freight Matching
  • Other [2]
    • User Group Meeting (2022)
    • BrokerWare v2 Themes (as of January 2023)
  • FAQ [2]
    • How do I submit a change or enhancement request?
    • How do I get live Support?
  • Home
  • /
  • Documentation
  • /
  • 3PL University – User Guides
  • /
  • Tools

Creating a Carrier Report via Report Builder

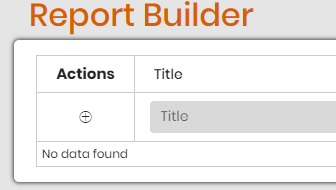
If you would like to create a report based on Carriers, you’ll want to go to Tools and then Report Builder. Once you’re on the Report Builder page, you’ll want to click the ‘+‘ sign under the Actions text.

After clicking on the ‘+’ sign, you’ll be prompted to this screen.

From here, you’ll want to add the name of the Report, a description if needed, and grant permissions to the necessary staff.

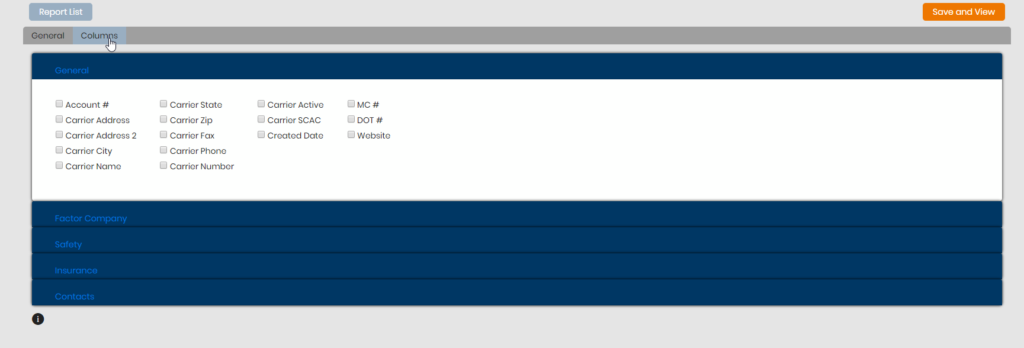
Afterwards, you’ll want to click on the Columns section and add the parameters you would like to include in the Carrier report, as seen here,

Keep in mind, that reports made for carriers have less column parameters than shipment or customer reports.

After you add all the parameters that you would like to add, hit Save and View and the carrier report will be available.

Last modified March 6, 2022

Doc navigation

Non-Compliance Feature (Events, Root Causes, QN notes) >
Was this page helpful?
Yes No

Need More Support?

Getting a hold of a team member is easy. You can contact our support team Monday through Friday from 6:00 am – 5:00pm (Pacific Time).

Email: support@3plsystems.com

Phone: 800.965.8205 x2

Get in touch

800-965-8205
sales@3plsystems.com

Navigation

  • 3PL University
  • Change Requests
  • News & Updates
  • Dev Center
  • 3PL Systems

Search

Search 3PLSupport.com

Copyright © 2023 · 3PL Systems, Inc. · All Rights Reserved · Built by Sir Lion Labs