• Skip to main content
  • Skip to header right navigation
  • Skip to site footer
3PL Support

3PL Support

BrokerWare Support from 3PL Systems

  • 3PL University
  • Change Requests
  • News & Updates
  • Dev Center
  • 3PL Systems
  • 3PL University – Videos [129]
    • Operations [42]
      • Dashboard [4]
        • Dashboard General Overview
        • Dashboard Tile Overview [1]
          • Dispatching – Booked Covered Tile
        • Source Capacity Dashboard
      • Customers [15]
        • Creating a Customer
        • Customer List
        • Customer Profile [6]
          • Customer Profile – Overview
          • Customer Contacts List
          • Adding a Customer Contact
          • Customer Address Book
          • How to Add a Third-Party Payer
          • Custom Carrier Compliance Events
        • Master Accounts [2]
          • Master Accounts
          • Address Book/Contacts/Products
        • Customer Portal [2]
          • Customer Portal Dashboard
          • Entering and Quoting a Load in Customer Portal
      • Carriers [4]
        • How to Add a TL Carrier
        • Carrier Contact Functions
        • Carrier Portal
        • Add/Update Carrier Insurance
      • Staff [2]
        • Create Staff
        • Office Locations
      • Load/Shipment [12]
        • How to Create a Load
        • Shipment Profile Lifecycle
        • Customer Rate Quotes – Electronic Signatures
        • Load Profile [8]
          • Commodity Field
          • Adding Additional Carriers
          • How to Change or remove a Carrier from a Load
          • Source Capacity (Volume Quotes) [2]
            • Overview
            • Sending Volume Rate Request
          • Dispatching – Manual and E-Mail Dispatch
          • Priority Shipments (Hot/Trace)
    • Accounting [41]
      • Shipment [4]
        • Modify Pricing
        • Changing Carriers
        • Multiple Carrier Bills
        • How to add a Third-Party Payer
      • How to Create an Invoice
      • Accounts Receivable [1]
        • AR Aging Detail
      • Accounts Payable [1]
        • AP Invoicing
      • Customer Profile [5]
        • Invoice Preferences [1]
          • Late Fees
        • Customer Statement [2]
          • Overview
          • Scheduling Invoices/Statements
      • Invoice Printing [3]
        • Overview
        • Print History
        • Reset Printing Queue
      • Office Locations
      • HyperionTMS – Accounting Updates (June 2022) [11]
        • AR & AP – Invoicing [4]
          • AR & AP Invoicing
          • AR – Invoice Revision – Increase
          • AR – Revision – Credit Memo
          • AP – Revision – Accrual Based
        • Check History – Void Checks
        • Commissions – Revisions
        • Invoice Preferences
        • Updated Staff Permissions
        • Carrier Sales
        • Webinar Meeting – Recording 6/12/2022
      • Internal Accounting [2]
        • Pay Bills
        • Pay Invoices
      • QuickBooks [4]
        • QuickBooks Desktop [2]
          • Sync Tool Configuration
          • Customer Recon Tool
        • QuickBooks Online
    • Tariff [18]
      • Tariff Creation [12]
        • API Tariff [5]
          • API Tariff Overview
          • Create a Global API Tariff
          • Create a Customer API Tariff
          • Add Service Lane Markup (API)
          • Adding Carriers to API Tariff – Customer Specific
        • Custom Tariff [4]
          • Custom Tariff Overview
          • Creating a Custom Carrier Tariff
          • Creating a Custom Customer Tariff
          • Creating a Custom Markup Tariff
        • Editing a Service Lane
      • Tariff List
      • Accessorials
      • Regions
      • Fuel Schedule & Schedule List
      • Pricing Programs
    • More [24]
      • Advanced Search
      • Carrier Sales
      • Custom Reference Fields [4]
        • Global Custom Reference Fields
        • Customer Custom Reference Fields
        • Where to Find Custom Reference Fields
        • How to report Custom Reference Fields
      • Custom Text [1]
        • Overview
      • Documents [2]
        • Document Uploader
        • Global Documents
      • Integrations [2]
        • Carrier Integrations
        • Other Integrations
      • Report Builder [3]
        • Report Builder
        • Report Builder – Shipment Report
        • Report Builder – Customer Report
      • Ship Mind
      • System Alerts
      • OnTime Report
      • Admin [1]
        • Min and Max Margins
  • 3PL University – User Guides [71]
    • Carriers [11]
      • Carrier Groups
      • Carrier List [2]
        • Add Bill-To Address for third-party integrations
        • Carrier Portal
      • Carrier Profile [2]
        • Create a Carrier Profile
        • How to Add/Update Carrier Insurance
      • Add multiple carriers/vendors to multi stop load
      • Rate Con vs Dispatch Sheet
      • Carrier Compliance setup
      • Adding a Secondary Vendor to a load
    • Customers [12]
      • Adding Accounting Contacts
      • Adding Contacts to a Customer Profile
      • Customer Log In Access Levels
      • Customer Relationship Management (CRM)
      • Hours of Operations
      • How to add a third-party payer
      • Indicate Primary Sales Rep
      • Sending a Customer Statement and Open Invoices
      • Sending and Scheduling Customer Statements
      • Master and Sub-Accounts
      • Create a Customer Profile
      • Changing a Customer on a load.
    • Staff [10]
      • Assigned To function
      • Add an Office Location Label
      • Staff Access Levels – UPDATED [6]
        • Admin
        • Manager
        • Accounting
        • Operations
        • Customer Sales
        • Carrier Sales
      • Creating a Staff Member
    • Accounting [6]
      • Adding Canada Tax Configurations
      • Claim Log
      • Consolidated Invoicing
      • Adding carrier SCAC to Customer Invoices with PRO Number
      • Electronic Signatures
      • Billing & View function
    • Tariff [7]
      • Add Service Lane Markup to API Tariff
      • Add/Create Customer API tariff
      • Creating Accessorials
      • How to create a Pricing Program
      • Priority & Contracted Lane Indicators on Service Lanes
      • Region Lists
      • Add Bill-To information for a Customer Specific Account: API Customer Tariff
    • Documents [1]
      • Mass Document Uploader
    • Tools [2]
      • Creating a Carrier Report via Report Builder
      • Non-Compliance Feature (Events, Root Causes, QN notes)
    • Admin Tools [3]
      • Changing Document Addresses
      • Staff Groups
      • Add Equipment Types to system
    • Integrations [6]
      • Triumph Pay Audit (formally Hubtran)
      • Authorize.Net
      • SMC3 Volume Integration
      • project44 / p44 Tracking
      • Macropoint Tracking
      • Other Integrations
    • QuickBooks [3]
      • Desktop Sync Tool Configuration
      • Re-Authorize Sync Application in QuickBooks Desktop
      • Office GL Code setup – QuickBooks Desktop
  • Industry Knowledge [4]
    • EDI
    • Freight Classes
    • Package Types
    • Accessorials
  • Webinars [2]
    • Cargo Chief Digital Freight Matching and BrokerWare
    • Digital Freight Matching
  • Other [2]
    • User Group Meeting (2022)
    • BrokerWare v2 Themes (as of January 2023)
  • FAQ [2]
    • How do I submit a change or enhancement request?
    • How do I get live Support?
  • Home
  • /
  • Documentation
  • /
  • 3PL University – User Guides
  • /
  • Accounting

Consolidated Invoicing

If a customer requests to have their invoices consolidated please follow the steps below. Consolidated invoices are grouped together when a sync is ran after invoices are created.

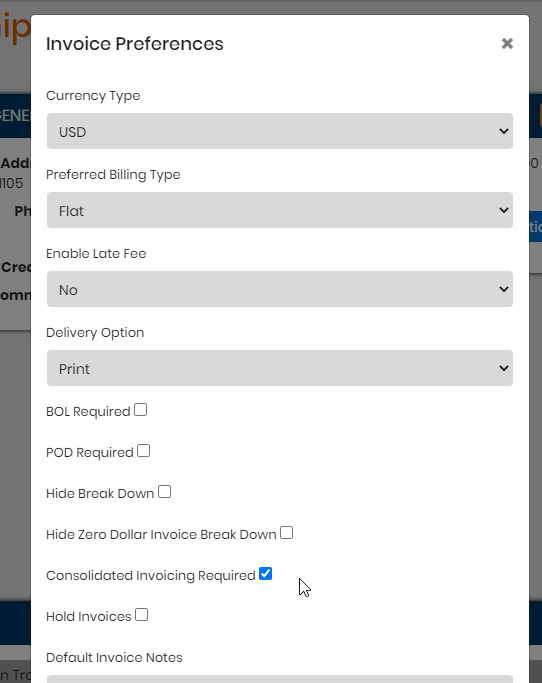
First, on a customer’s profile, go to Invoice Preferences > check off Consolidated Invoicing Required. This will setup the customer’s invoices going forward to be consolidated together when the next invoices are created and synced. This can be used for either Print or Email Delivery Options.

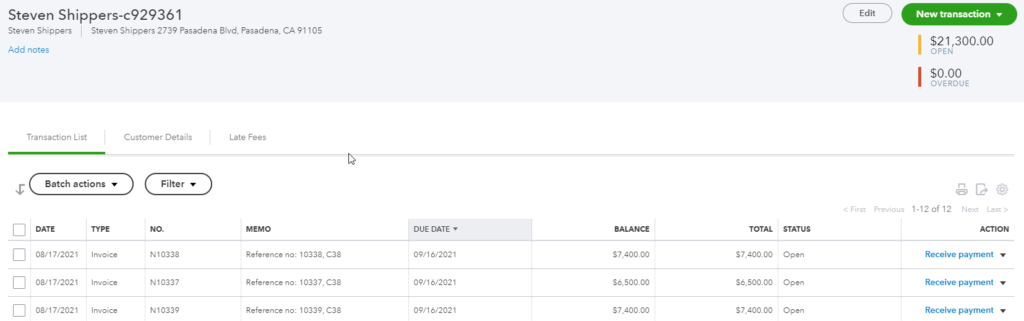
The next time staff users create invoices for the customer, they will become ‘batched’ together on a summary invoice. Each invoice will still be treated as its own individual entity when syncing to QB but in BrokerWare, you can see which ones are grouped together by a C and then a number i.e. CXXX.

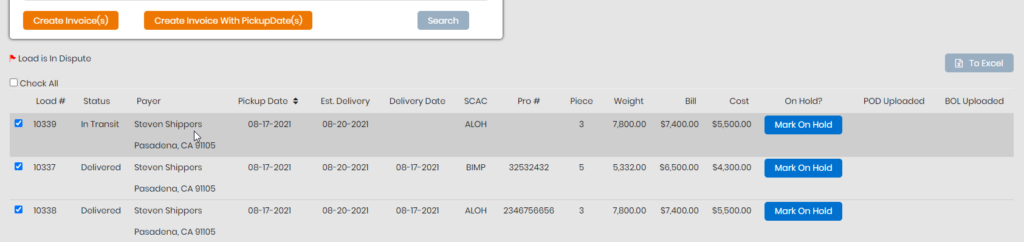
In the example below, the 3 invoices checked are going to be invoiced and then a sync will be ran. There is no limit as to how many invoices can be grouped together on a consolidated invoice but please keep in mind that once a sync is ran, those invoices that were generated prior to the sync will be on the consolidated invoice at the time. You can see on the AR Aging Detail next to the invoice/load number the consolidated load reference for each one.

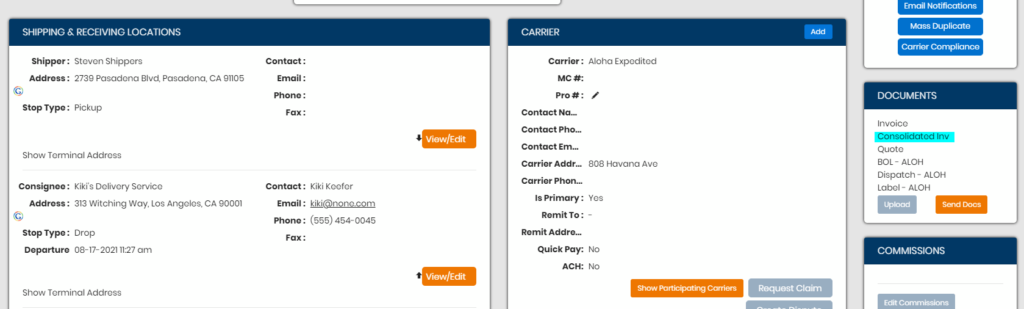
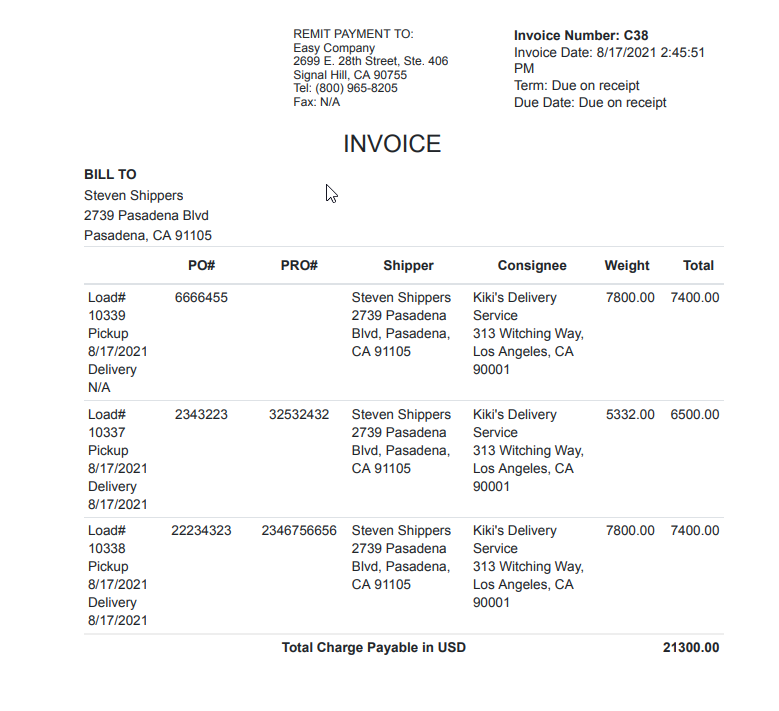
On the shipment profile, you can see an additional document call Consolidated Inv. If you click on this you can view the summary invoice of all loads consolidated to one document. It will contain a brief summary of info for each load along with the total AR charges for each, totaling at the bottom for the grand total amount due for the consolidated invoice. This summary invoice along with each individual invoice (and POD and BOL docs if requested) can be emailed or printed via Invoice Printing queue pending the Delivery Option method selected for the customer’s invoice preferences.

When the invoices of a consolidated invoice sync to QB, you will see the same consolidated reference number in the Memo. Screens shot below is from QuickBooks Online. Treat the invoices as normal when applying payments; the CXXX reference is for noting the invoices were part of a consolidated batch.

Last modified March 6, 2022

Doc navigation

Adding carrier SCAC to Customer Invoices with PRO Number >
Was this page helpful?
Yes No

Need More Support?

Getting a hold of a team member is easy. You can contact our support team Monday through Friday from 6:00 am – 5:00pm (Pacific Time).

Email: [email protected]

Phone: 800.965.8205 x2

Get in touch

800-965-8205
[email protected]ems.com

Navigation

  • 3PL University
  • Change Requests
  • News & Updates
  • Dev Center
  • 3PL Systems

Search

Search 3PLSupport.com

Copyright © 2023 · 3PL Systems, Inc. · All Rights Reserved · Built by Sir Lion Labs