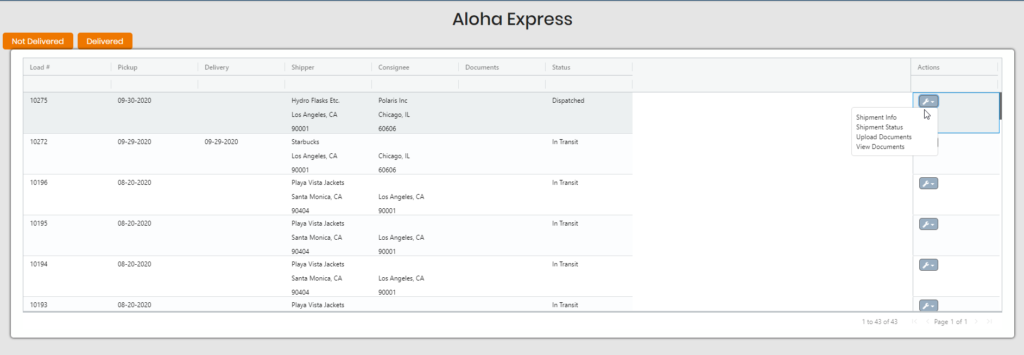
A carrier portal will allow carrier contacts setup in the carrier profile to log into a portal in 3PL to which they can update statuses of shipments and upload documents to loads they are tendering.
First, create a carrier profile. Next, add carrier contacts to the Contacts section. If you would like a contact to be able to log into the carrier portal, check off Is User and fill out the First Name, Last Name and give the contact a password. They will use their email and given password to log into the same URL as your system.

Carrier Portal View
When a carrier contact logs into the portal, they’ll get a summary view of shipments that their carrier is assigned to. Any carrier contact saved in the carrier profile will be able to see all the shipments.
They can view by Not Delivered (all shipments that have a status between Dispatched to Out for Delivery) and Delivered. The carrier cannot click to view the actual load profile so they will not see any pricing.

On the right, there’s a wrench icon that allows them to perform the following actions:
- Shipment Info – Provides further information of the load (i.e. shipper and consignee locations and commodity information).
- Shipment Status – Allows carrier contact to update the status of the load as well as input the PRO number, update pickup date and time and leave a note (viewable in the notes section of the load). However, once a load is set to delivered, they cannot back track on statuses. The carrier will need to reach out to the brokerage to move a load back to a different status i.e. if a load needs to go back to in transit but was accidentally marked delivered by the carrier.
- Upload Documents – Allows user to upload files to the load directly. Carrier contact users cannot remove uploaded documents from loads; they will need to contact the brokerage staff to do so.
- View Documents – If a user uploads a document to the load, they can see the file name they gave in the window. These can also be noted in the Documents column.


