• Skip to main content
  • Skip to header right navigation
  • Skip to site footer
3PL Support

3PL Support

BrokerWare Support from 3PL Systems

  • 3PL University
  • Change Requests
  • News & Updates
  • Dev Center
  • 3PL Systems
  • 3PL University – Videos [129]
    • Operations [42]
      • Dashboard [4]
        • Dashboard General Overview
        • Dashboard Tile Overview [1]
          • Dispatching – Booked Covered Tile
        • Source Capacity Dashboard
      • Customers [15]
        • Creating a Customer
        • Customer List
        • Customer Profile [6]
          • Customer Profile – Overview
          • Customer Contacts List
          • Adding a Customer Contact
          • Customer Address Book
          • How to Add a Third-Party Payer
          • Custom Carrier Compliance Events
        • Master Accounts [2]
          • Master Accounts
          • Address Book/Contacts/Products
        • Customer Portal [2]
          • Customer Portal Dashboard
          • Entering and Quoting a Load in Customer Portal
      • Carriers [4]
        • How to Add a TL Carrier
        • Carrier Contact Functions
        • Carrier Portal
        • Add/Update Carrier Insurance
      • Staff [2]
        • Create Staff
        • Office Locations
      • Load/Shipment [12]
        • How to Create a Load
        • Shipment Profile Lifecycle
        • Customer Rate Quotes – Electronic Signatures
        • Load Profile [8]
          • Commodity Field
          • Adding Additional Carriers
          • How to Change or remove a Carrier from a Load
          • Source Capacity (Volume Quotes) [2]
            • Overview
            • Sending Volume Rate Request
          • Dispatching – Manual and E-Mail Dispatch
          • Priority Shipments (Hot/Trace)
    • Accounting [41]
      • Shipment [4]
        • Modify Pricing
        • Changing Carriers
        • Multiple Carrier Bills
        • How to add a Third-Party Payer
      • How to Create an Invoice
      • Accounts Receivable [1]
        • AR Aging Detail
      • Accounts Payable [1]
        • AP Invoicing
      • Customer Profile [5]
        • Invoice Preferences [1]
          • Late Fees
        • Customer Statement [2]
          • Overview
          • Scheduling Invoices/Statements
      • Invoice Printing [3]
        • Overview
        • Print History
        • Reset Printing Queue
      • Office Locations
      • HyperionTMS – Accounting Updates (June 2022) [11]
        • AR & AP – Invoicing [4]
          • AR & AP Invoicing
          • AR – Invoice Revision – Increase
          • AR – Revision – Credit Memo
          • AP – Revision – Accrual Based
        • Check History – Void Checks
        • Commissions – Revisions
        • Invoice Preferences
        • Updated Staff Permissions
        • Carrier Sales
        • Webinar Meeting – Recording 6/12/2022
      • Internal Accounting [2]
        • Pay Bills
        • Pay Invoices
      • QuickBooks [4]
        • QuickBooks Desktop [2]
          • Sync Tool Configuration
          • Customer Recon Tool
        • QuickBooks Online
    • Tariff [18]
      • Tariff Creation [12]
        • API Tariff [5]
          • API Tariff Overview
          • Create a Global API Tariff
          • Create a Customer API Tariff
          • Add Service Lane Markup (API)
          • Adding Carriers to API Tariff – Customer Specific
        • Custom Tariff [4]
          • Custom Tariff Overview
          • Creating a Custom Carrier Tariff
          • Creating a Custom Customer Tariff
          • Creating a Custom Markup Tariff
        • Editing a Service Lane
      • Tariff List
      • Accessorials
      • Regions
      • Fuel Schedule & Schedule List
      • Pricing Programs
    • More [24]
      • Advanced Search
      • Carrier Sales
      • Custom Reference Fields [4]
        • Global Custom Reference Fields
        • Customer Custom Reference Fields
        • Where to Find Custom Reference Fields
        • How to report Custom Reference Fields
      • Custom Text [1]
        • Overview
      • Documents [2]
        • Document Uploader
        • Global Documents
      • Integrations [2]
        • Carrier Integrations
        • Other Integrations
      • Report Builder [3]
        • Report Builder
        • Report Builder – Shipment Report
        • Report Builder – Customer Report
      • Ship Mind
      • System Alerts
      • OnTime Report
      • Admin [1]
        • Min and Max Margins
  • 3PL University – User Guides [71]
    • Carriers [11]
      • Carrier Groups
      • Carrier List [2]
        • Add Bill-To Address for third-party integrations
        • Carrier Portal
      • Carrier Profile [2]
        • Create a Carrier Profile
        • How to Add/Update Carrier Insurance
      • Add multiple carriers/vendors to multi stop load
      • Rate Con vs Dispatch Sheet
      • Carrier Compliance setup
      • Adding a Secondary Vendor to a load
    • Customers [12]
      • Adding Accounting Contacts
      • Adding Contacts to a Customer Profile
      • Customer Log In Access Levels
      • Customer Relationship Management (CRM)
      • Hours of Operations
      • How to add a third-party payer
      • Indicate Primary Sales Rep
      • Sending a Customer Statement and Open Invoices
      • Sending and Scheduling Customer Statements
      • Master and Sub-Accounts
      • Create a Customer Profile
      • Changing a Customer on a load.
    • Staff [10]
      • Assigned To function
      • Add an Office Location Label
      • Staff Access Levels – UPDATED [6]
        • Admin
        • Manager
        • Accounting
        • Operations
        • Customer Sales
        • Carrier Sales
      • Creating a Staff Member
    • Accounting [6]
      • Adding Canada Tax Configurations
      • Claim Log
      • Consolidated Invoicing
      • Adding carrier SCAC to Customer Invoices with PRO Number
      • Electronic Signatures
      • Billing & View function
    • Tariff [7]
      • Add Service Lane Markup to API Tariff
      • Add/Create Customer API tariff
      • Creating Accessorials
      • How to create a Pricing Program
      • Priority & Contracted Lane Indicators on Service Lanes
      • Region Lists
      • Add Bill-To information for a Customer Specific Account: API Customer Tariff
    • Documents [1]
      • Mass Document Uploader
    • Tools [2]
      • Creating a Carrier Report via Report Builder
      • Non-Compliance Feature (Events, Root Causes, QN notes)
    • Admin Tools [3]
      • Changing Document Addresses
      • Staff Groups
      • Add Equipment Types to system
    • Integrations [6]
      • Triumph Pay Audit (formally Hubtran)
      • Authorize.Net
      • SMC3 Volume Integration
      • project44 / p44 Tracking
      • Macropoint Tracking
      • Other Integrations
    • QuickBooks [3]
      • Desktop Sync Tool Configuration
      • Re-Authorize Sync Application in QuickBooks Desktop
      • Office GL Code setup – QuickBooks Desktop
  • Industry Knowledge [4]
    • EDI
    • Freight Classes
    • Package Types
    • Accessorials
  • Webinars [2]
    • Cargo Chief Digital Freight Matching and BrokerWare
    • Digital Freight Matching
  • Other [2]
    • User Group Meeting (2022)
    • BrokerWare v2 Themes (as of January 2023)
  • FAQ [2]
    • How do I submit a change or enhancement request?
    • How do I get live Support?
  • Home
  • /
  • Documentation
  • /
  • 3PL University – User Guides
  • /
  • Integrations

Triumph Pay Audit (formally Hubtran)

The integration with Triumph Pay Audit (TPA) is a bi-directional data transfer with 3PL and Triumph Pay Audit. In short, 3PL sends the following data from noted profiles to Triumph Pay Audit.

Please note: Fields marked with an * in this article are REQUIRED to be filled out or else the integration will not work.

Table of Contents[Hide][Show]
  • From 3PL Systems To Triumph Pay Audit
  • Triumph Pay Audit setup in 3PL Systems+−
    • Token*
    • Profit Margin Threshold %
    • Ignore Profit Margin Error*
    • Do not update Pro #*
    • Create Quick Pay Accessorial
  • New as of 12/20/2021
  • Common Triumph Pay Audit error notification

From 3PL Systems To Triumph Pay Audit

From shipment profile

Origin Stop and last Destination stop of load (company, address lines 1 and 2, city, state, zip, country code), Estimated delivery date and time range, delivery date (once established – If it is not established, it’s NULL in TPA) pickup date, shipment status of load in 3PL, Reference Information section, General Information section (not including Target Rate), PRO number (only the primary carrier of the load), created date of shipment and any modified dates. The commodity information is to be sent as well except for linear feet value, profit margin value, Code, Pallet Size, is Palletized flag, is Stackable flag.

From customer’s profile

In Invoice Preferences, if the POD is required, this flag indication will be sent to TPA.

From carrier profile

Carrier name, SCAC, DOT number, MC number, Active status, EIN Number, Currency Code (located on carrier profile), Quick Pay flag (carrier profile), Carrier Term (carrier profile), Remit To Information (First is Carrier Factor Company, then if that does not exist then it will use the Bill To Information from the carrier profile. If that does not exist, system will use the address in Different Mailing Address field from carrier profile. If all above does not exist, then system will send the standard address saved to carrier profile).

Triumph Pay Audit setup in 3PL Systems

To setup TPA’s integration in 3PL, you will first need to contact TPA to get an account. They are extremely helpful and can get their end setup right away prior to any demo they give.

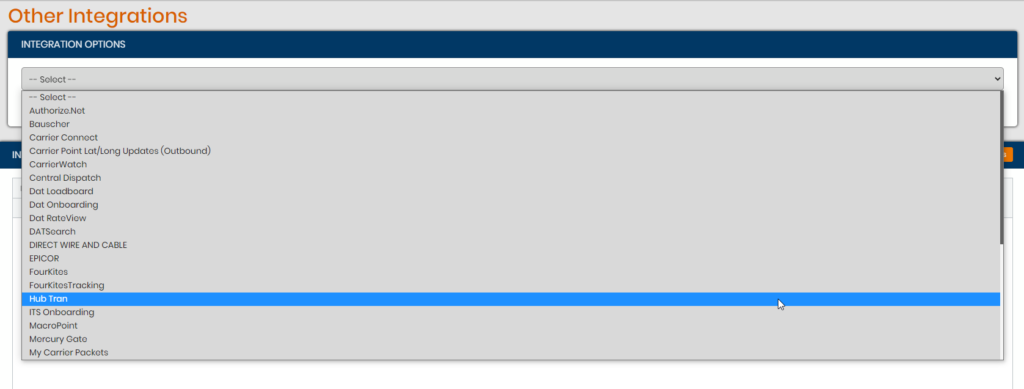
In 3PL, add TPA’s integration by going to Integrations > Other Integrations > select Triumph Pay Audit > Add. Note: only Admin staff can see and manage this page.
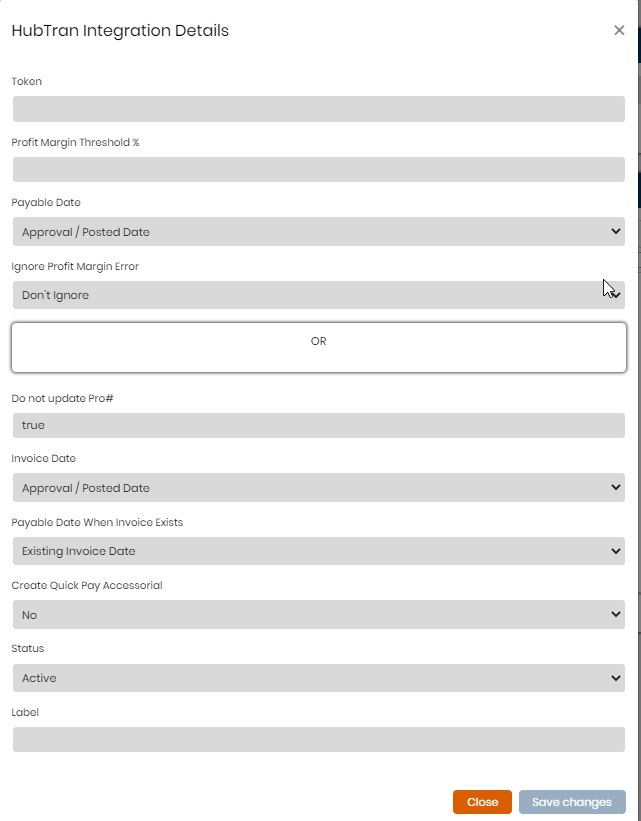
Token*

(3PL & Triumph Pay use only) – This token needs to be given by TPA. This is how the API from TPA connects the user’s account with 3PL. TPA will usually ask about webhook URL:

Example Webhook:

https://3pl.hyperiontms.com/api/v1/hubtran/invoice

Replace the website with actual client’s website and give to Triumph Pay Audit.

Profit Margin Threshold %

Comparing profit margin percent to threshold percent on shipment profiles, if the profit margin on a load falls BELOW the profit margin threshold percent value here the system will not proceed in creating the invoice or receiving the payable until the profit margin rule here is corrected. Shipment will indicate in notes if a load’s invoice and carrier payable were processed (the profit margin of 2% is less than the profit margin threshold of 5% example)

  • blank – not using at all
  • 0 – literally means that the profit margin is 0%. Anything that falls into a negative profit margin will result in neither customer or carrier bill being created in 3PL.

Ignore Profit Margin Error*

  • Don’t Ignore (defaulted value) – It will work as expected per the explanation above in Profit Margin Threshold % – will stamp an audit trail in the notes section of loads
  • Ignore – System will ignore value in Profit Margin Threshold % field so the rule is no longer being enforced, but will have an audit trail in notes on shipments.

Do not update Pro #*

It is required to type out the word ‘true’ or ‘false’ (case sensitive)

  • true– (defaulted value) – PRO number will NOT be updated by the PRO number indicated on TPA’s side. There will be no error and the user can still process the payable from TPA, but PRO number on 3PL shipment profile is not affected.
  • false – PRO number on shipment profile in 3PL will be updated by the PRO number indicated from the carrier bill processed on TPA’s portal.

Create Quick Pay Accessorial

Links with carrier profile Quick Pay flag. TPA sends an amount to pay and is the same amount 3PL compares the threshold to. If the amount is LESS THAN the total carrier cost and carrier is a Quick Pay enable, 3PL will take that difference sent from TPA and create an accessorial on the load and indicate a negative cost value. If you add the negatvie value to the total carrier cost, it will then equal the cost that TPA is sending. Keep in mind, there is some risk with this because IF the TPA cost is less than the cost in 3PL by the intended carrier and that is correct (without Quick Pay involved) we would not have a way to verify this scenario. This is in assumption that the carrier cost from TRIUMPH PAY AUDIT already has the quick pay amount incorporated into it.

New as of 12/20/2021

*Invoice Date – effects loads that do NOT yet have the AR invoice created in BW (same options as Payable Date)

*Payable Date drop down – the AP date in BW to be reflected on the load when loads are processed through Triumph Pay Audit- ONLY effects loads when Customer AR Invoice is NOT yet CREATED)

Approval/Posted Date- (defaulted value) – First date when TPA sends over any documents from their portal – this would be the date set for the AR invoice to begin its aging.

Delivery date – Date indicated on load profiles in BW for Delivery Date

Triumph Pay Audit’s Invoice Date – Date sent from TPA’s portal to BW; this will be the AP date reflected on load

*Payable Date When Invoice Exists drop down – this effects loads where AR invoice already has been created

Existing Invoice Date (defaulted value) – AP date will reflect the date of the existing AR invoice on load in BW – this is under the impression that a user in BW created the AR invoice prior to processing the AP in TPA

Delivery Date – Date indicated on load profiles in BW for Delivery Date

Triumph Pay Audit Invoice Date – Date sent from TPA’s portal to BW; this will be the AP date reflected on load

Common Triumph Pay Audit error notification

{"response":"Error Processing the request ----- Message: Payment amount mismatch between TriumphPay Audit 775.41$ and 3PL Systems 784.39$ -----  Inner Exception Message:  -Logic Repsonse: Success"}
  • At the time the payable was being process in Triumph Pay Audit, the cost amount in TPA and 3PL did not match. You would need to go back to 3PL and update the total cost on the load to match what TPA’s cost indicates and try again. Make sure the commodity section in BW on shipment profile is FINALIZED before doing the approval in TPA.
  • Triumph Pay Audit will NOT send updated the cost value from their portal – all changes must be done in BW in order to match TPA’s side.

Revised as of July 2022

Last modified July 22, 2022

Doc navigation

Authorize.Net >
Was this page helpful?
Yes No

Need More Support?

Getting a hold of a team member is easy. You can contact our support team Monday through Friday from 6:00 am – 5:00pm (Pacific Time).

Email: [email protected]

Phone: 800.965.8205 x2

Get in touch

800-965-8205
[email protected]

Navigation

  • 3PL University
  • Change Requests
  • News & Updates
  • Dev Center
  • 3PL Systems

Search

Search 3PLSupport.com

Copyright © 2023 · 3PL Systems, Inc. · All Rights Reserved · Built by Sir Lion Labs